 Has it ever happened to you that someone showed you a simple thing that was right in front of your nose for years?
Learning these DSLR camera tricks and shortcuts were such lightbulb moments for me. Some feature I found it I after years shooting with the camera 🙂
Now I’m sharing these with you – and I promise: at least one will be new for you as well! Good news for mirrorless people: these tips can be applied to those bodies too.
Onto the tricks…
1. Using aperture priority mode with Auto ISO when shooting handheld during the day
By far, the setting I use all the time.
What does it do?
When shooting in aperture priority mode, you select your desired aperture (or f-stop), and the camera calculates, meters the correct shutter speed for that..
For example, it’s a cloudy day, and you’re on ISO100, f/8, and the camera sets a shutter speed of 1/30 sec. And you use a 24-70mm which may shake with such long shutter speed
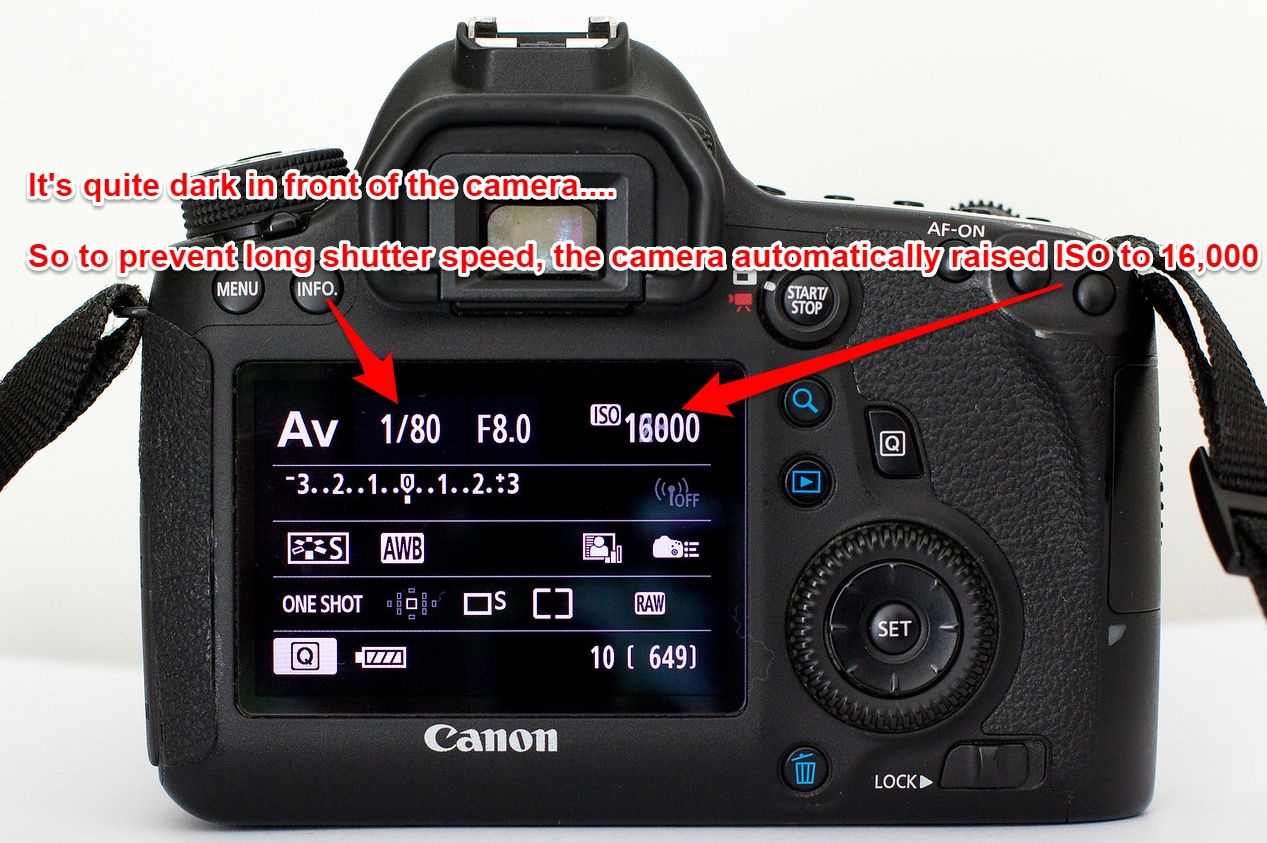
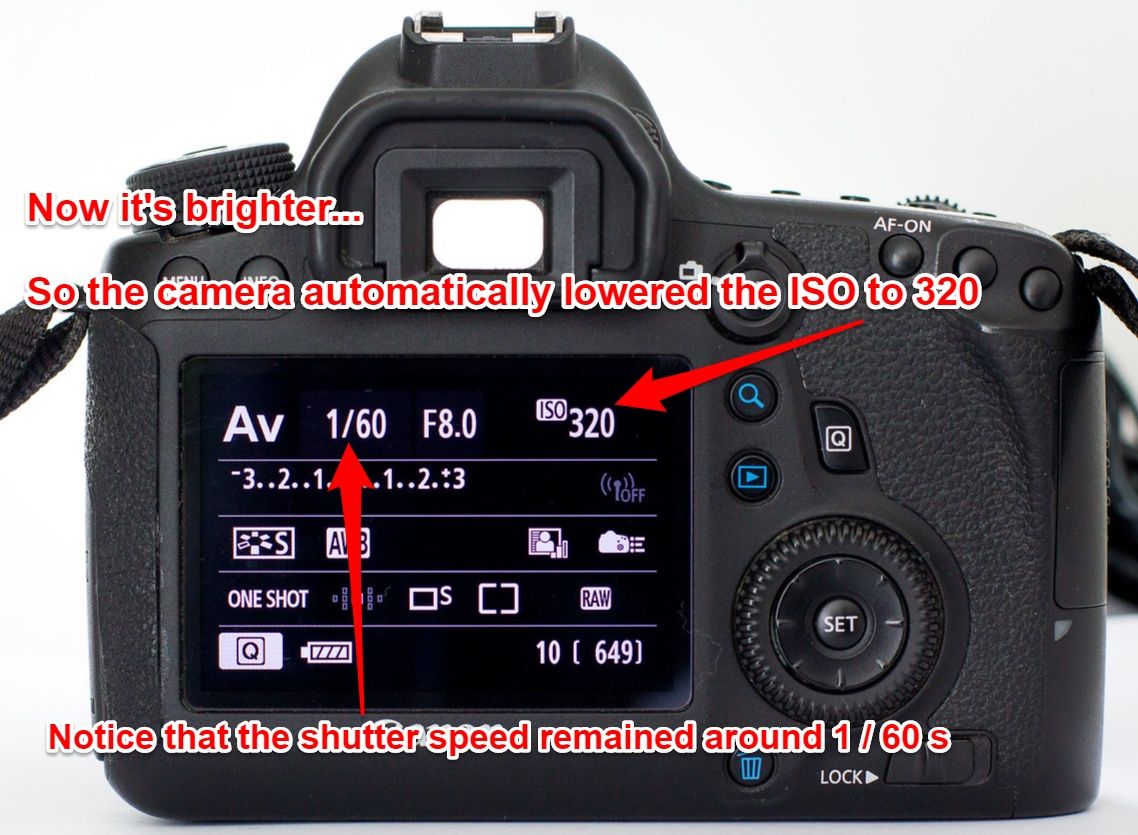
In this case, because there’s not enough light, you would have to raise the ISO to make the shutter speed faster, so that it will not be blurry by your handshake:
ISO200, f/8 would result 1/60 sec shutter speed.
This is when Auto ISO feature comes to the rescue!
It eliminates you having to constantly keep an eye on the ISO: the camera sets it for you automatically.
How does Auto ISO work?
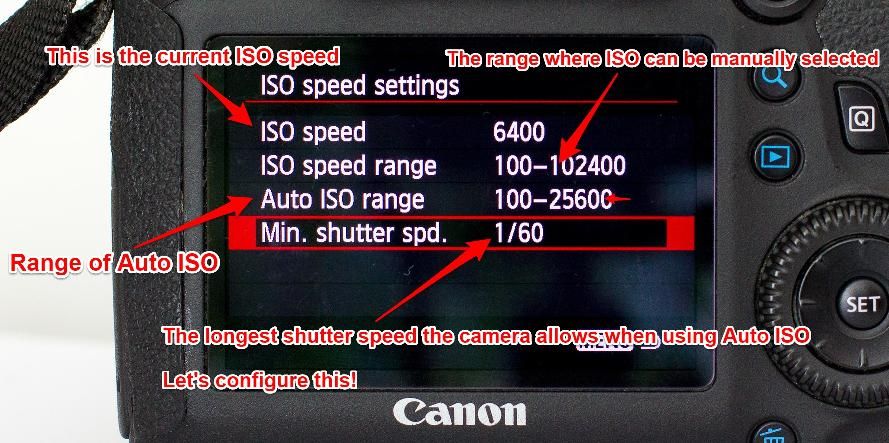
Auto ISO tells the camera to always set an ISO speed with which the shutter speed doesn’t go too long. Basically, it never lets the shutter speed go beyond a certain point.
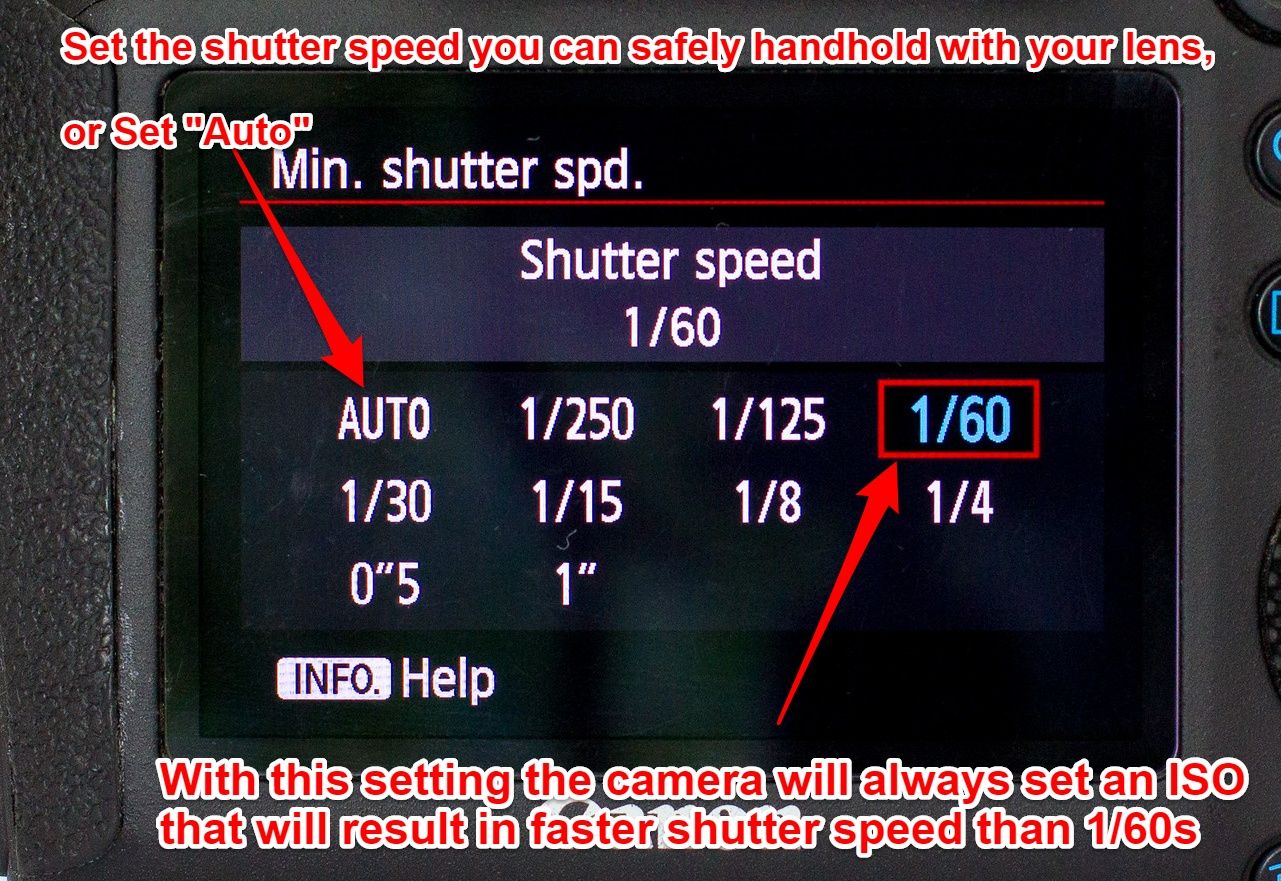
This point, in other words, the minimum shutter speed can be configured (I’ll show you in a minute).
How to set it up?
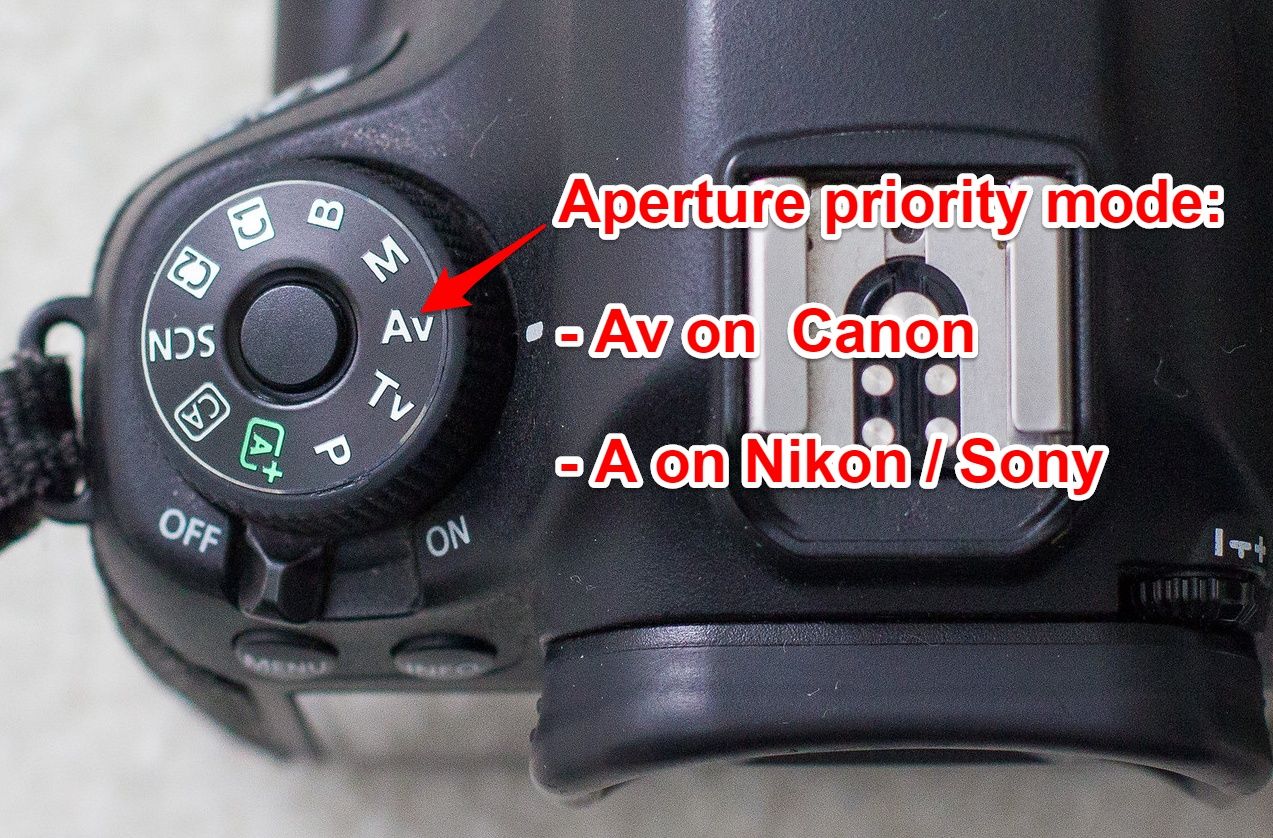
1. Put the camera’s mode into Aperure priority
On the mode dial it’s depicted as Av on Canon, and A on Nikon and Sony
2. Select the desired aperture
Take into account the amount of light, and the depth of field you’d like to achieve.
Remember: the higher the f-number, the deeper the depth of field (more things will be in focus).
For portraits you want to use the widest aperture (low f values, like f/2.8), while for landscapes it’s better to go around f/8-11.
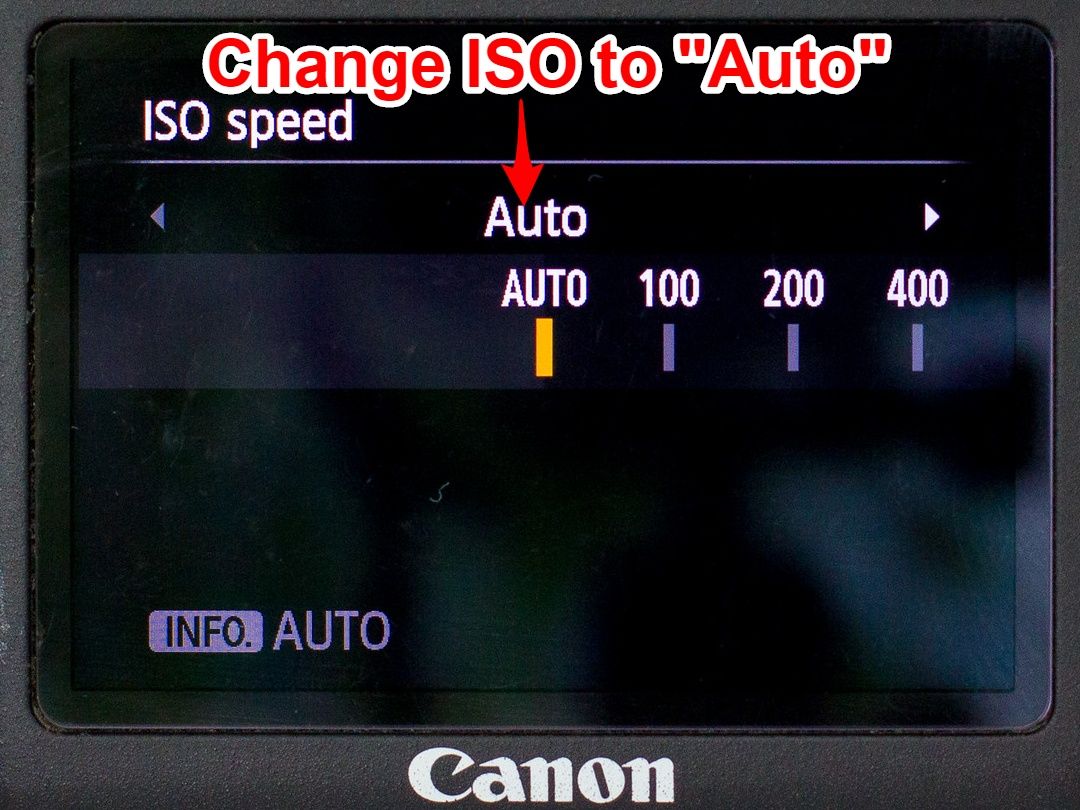
3. Change ISO into Auto ISO
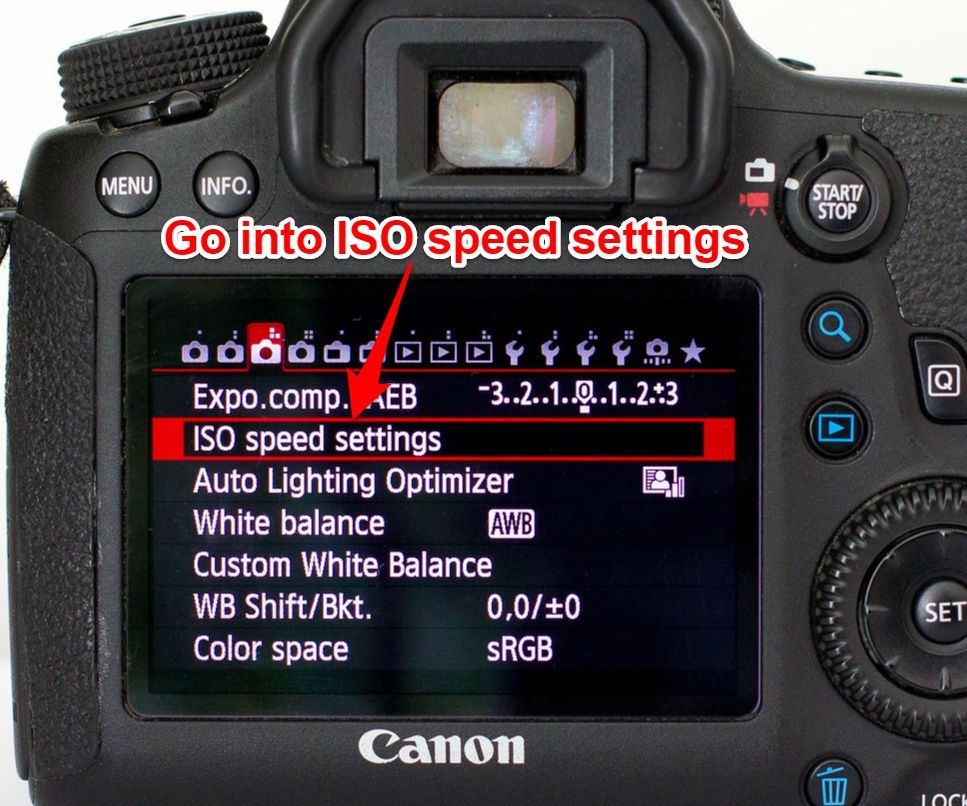
4. Configure the Auto ISO
You can’t customize the Auto ISO on most entry level cameras, but the majority of the middle or high end cameras you can.
Here’s how it looks on my Canon 6D Mk I:
What minimum shutter speed to set?
Well , that depends on the focal length of your lens, if you have IS, if you have a moving subject, etc.
A few examples though:
- at 24mm you could hand hold 1/60 s
- at 50mm 1/100 s
- at 200mm 1/500 s
These values are for maximum sharpness, normally you’d be able to handhold twice as fast speeds too.
If you have IS, you can go with 2 stops longer shutter speeds.
What to do if you’re not satisfied with the result?
If it’s too dark or too bright, use the exposure compensation dial, to override the camera’s metering, just like you would normally.
For example, if it’s dark, then increase the exposure compensation (like +1 EV).
If it’s too bright, decrease the exposure compensation (like -1 EV).
Bottom line: when shooting during daytime handheld it’s easiest to use Aperture priority mode with Auto ISO settings. So you only select the aperture, and the camera takes care of the rest.
Onto the next tip…
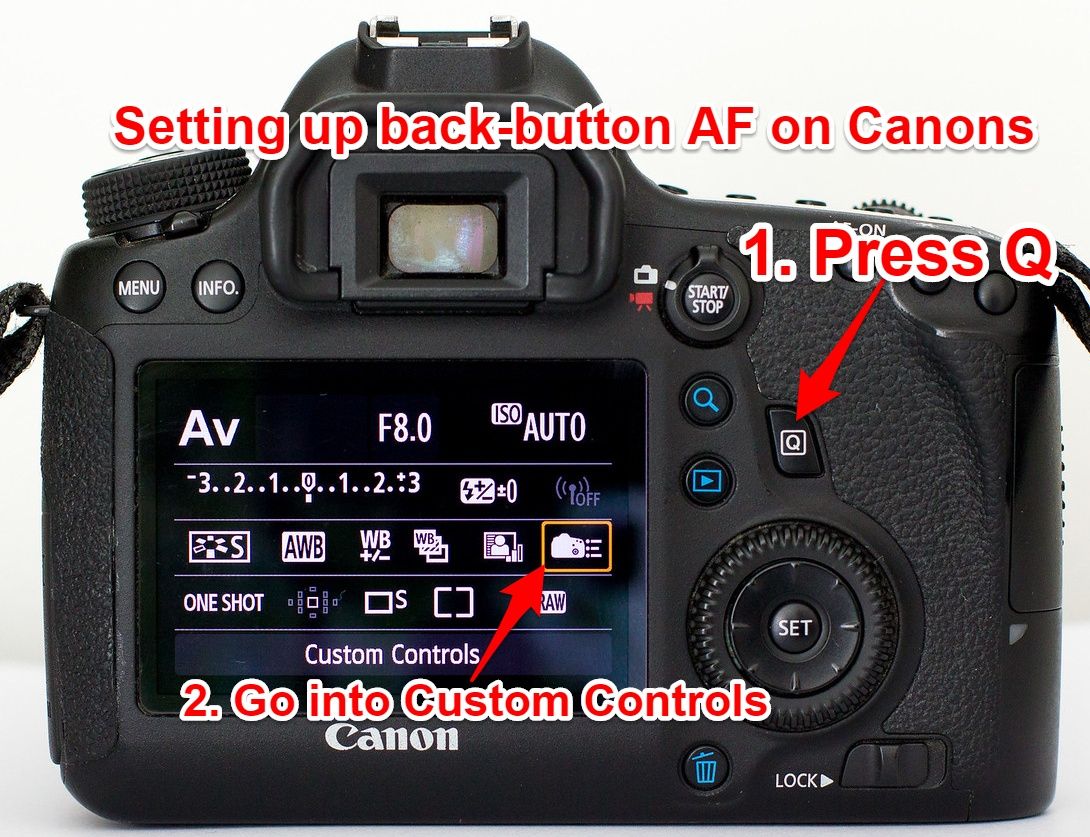
2. Focusing with back button AF
This one requires a transformation for many people: it took me days to get used too, and months for my wife (she still doesn’t really like it though).
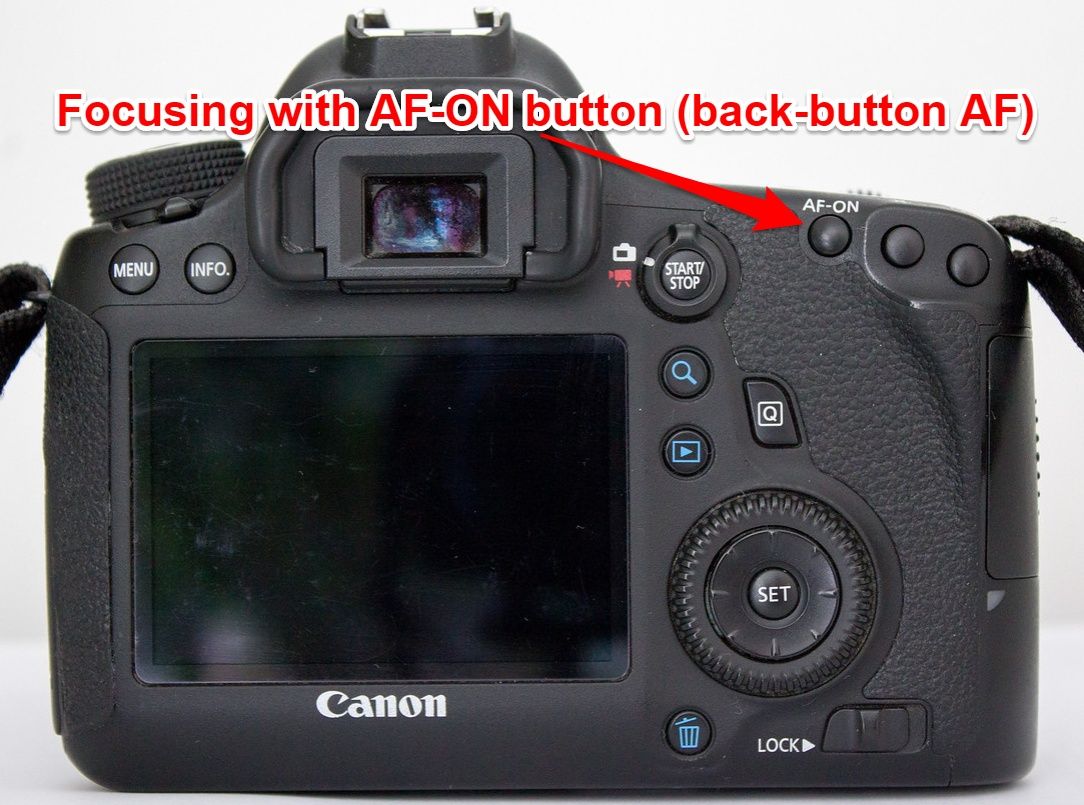
Did you know that you can use this button to trigger Autofocus too?
It lies comfortably at you thumb finger. It’s only to focus, you still press the shutter button to shoot.
Why is back button AF good?
Because the AF and taking the shot is no longer coupled together. You don’t have to worry about accidentally pressing the shutter button all the way down.
Plus, once focused, you can easily compose without having to hold the shutter button halfway down.
When used together with follow or tracking autofocus, it makes life a lot easier.
Steve Perry has an excellent youtube tutorial on this feature:
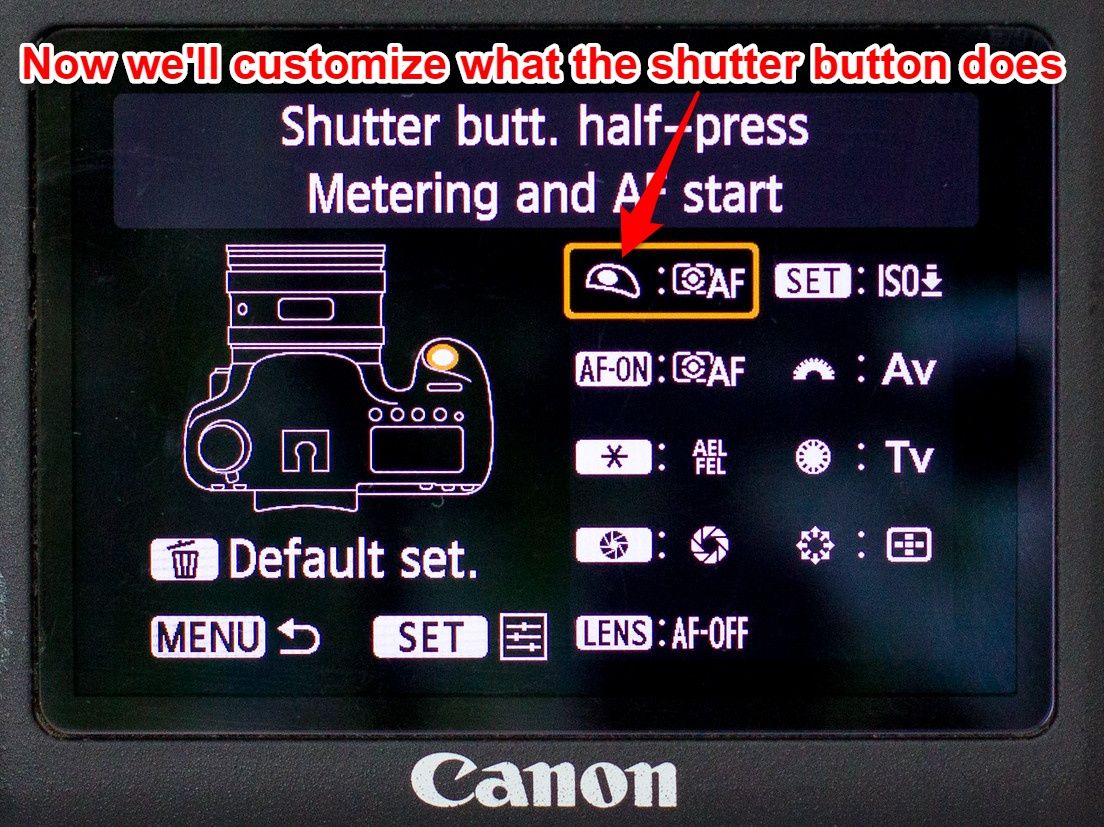
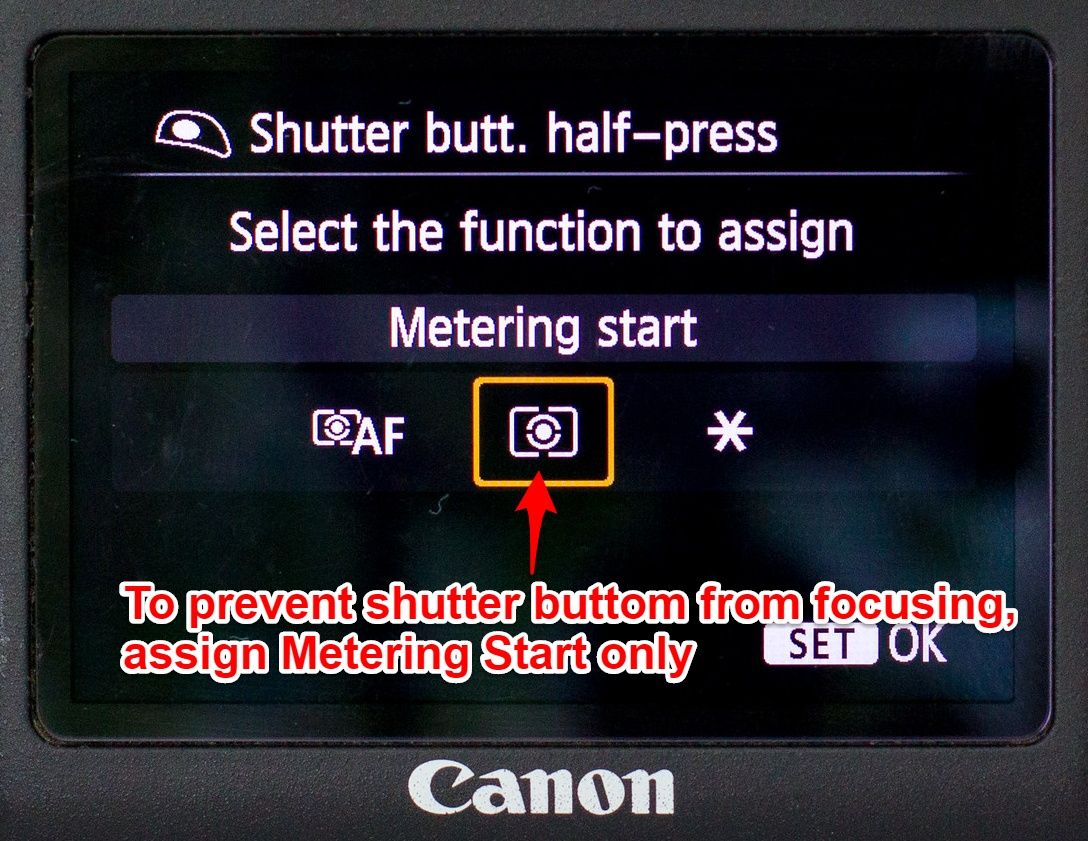
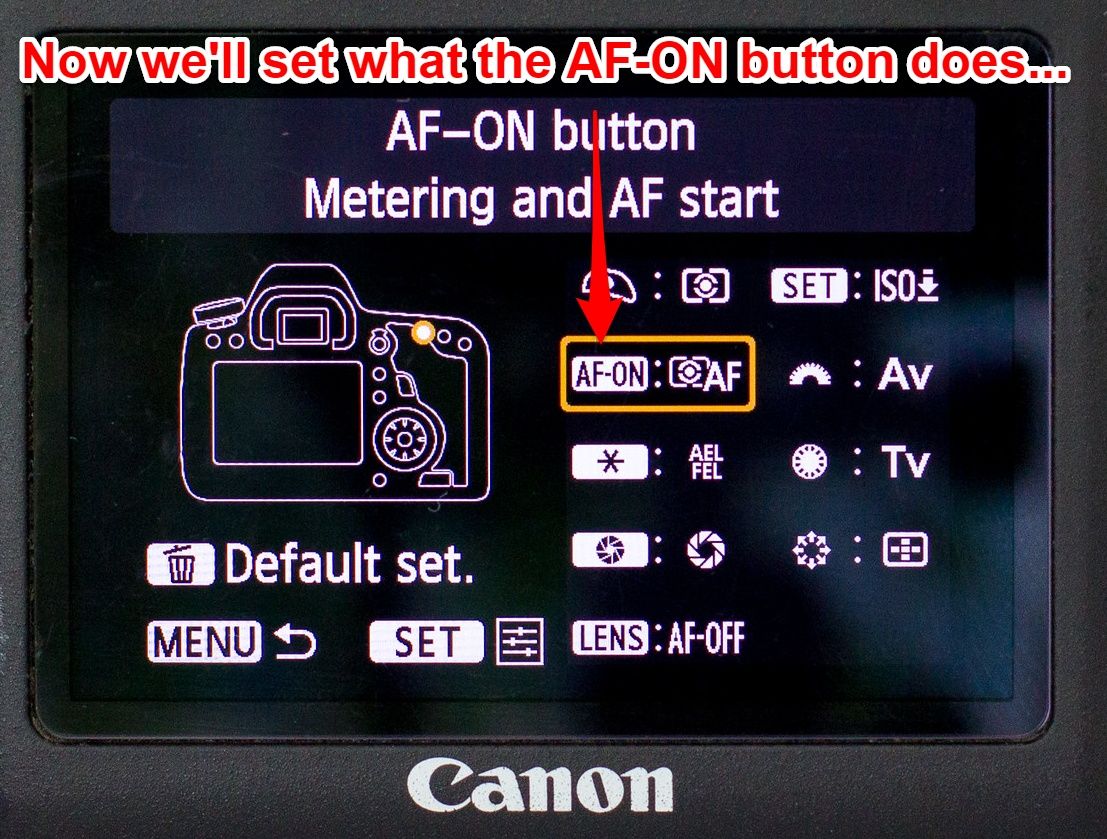
How to set up back button AF on a higher end Canon?
This varies from camera to camera. I’ll show it now on my Canon 6D.
How to set up back button AF on a lower end Canon?
On lower end Canons (like 700D), setting up back button autofocus is a bit different: you have to assign the * button for this function.
Go into Menu -> Custom Controls -> Operation / Others -> Shutter / AE lock button -> AE / AF (no AE lock)
Setting up AF-ON button autofocus on higher end Nikons
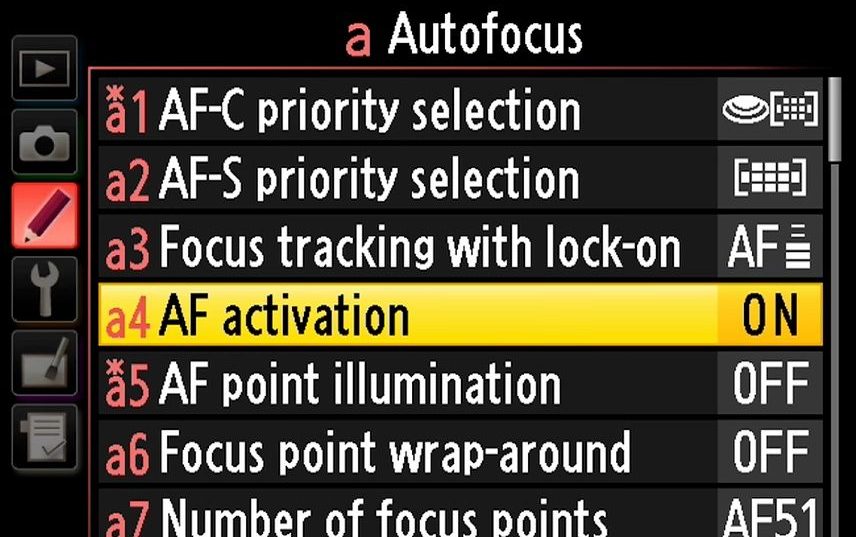
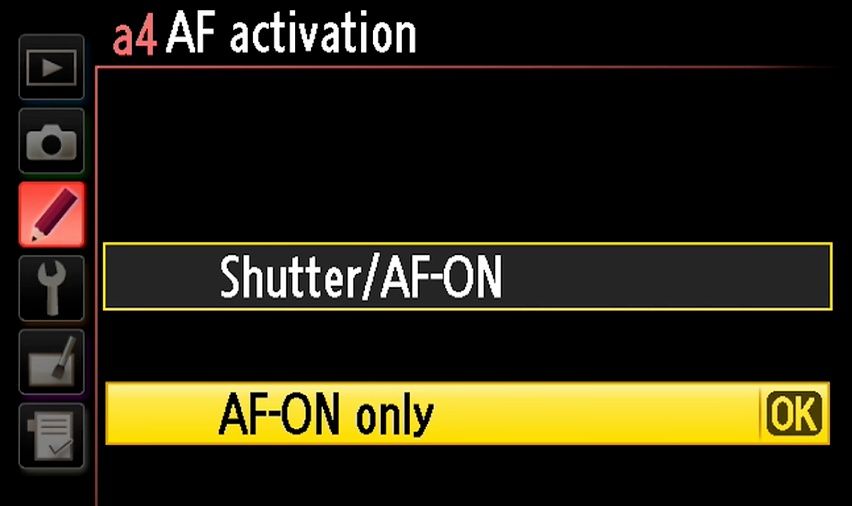
On higher end Nikons you have to go into the Custom Settings Menu -> Autofocus -> AF activation -> AF-ON only
Setting up AF-ON button autofocus on lower end Nikons
On lower-end Nikons it’s a bit different, because then you’ll have to assign this function to the AE-L/AF-L button.
To do this go into the Menu -> Controls -> Assign AE-L/AF-L button -> AF-ON
Setting up back button AF on Sony A6000 and A7 series
There’s no AF-ON button here, but this function can be assigned to the AEL button.
In the Custom Settings, configure:
1. Pre-AF > Off (this disables the camera to constantly keep in focus)
2. Custom Key Settings > AEL Button > AF On (assigns AF to AEL button)
3. Custom Key Settings > AF/MF Button > AF/MF Ctrl Toggle.
4. AF w/shutter > Off (disengages shutter button from AF)
Onto the next tricks: using tripods!
3. Shooting in vertical orientation with telephoto lenses on tripod
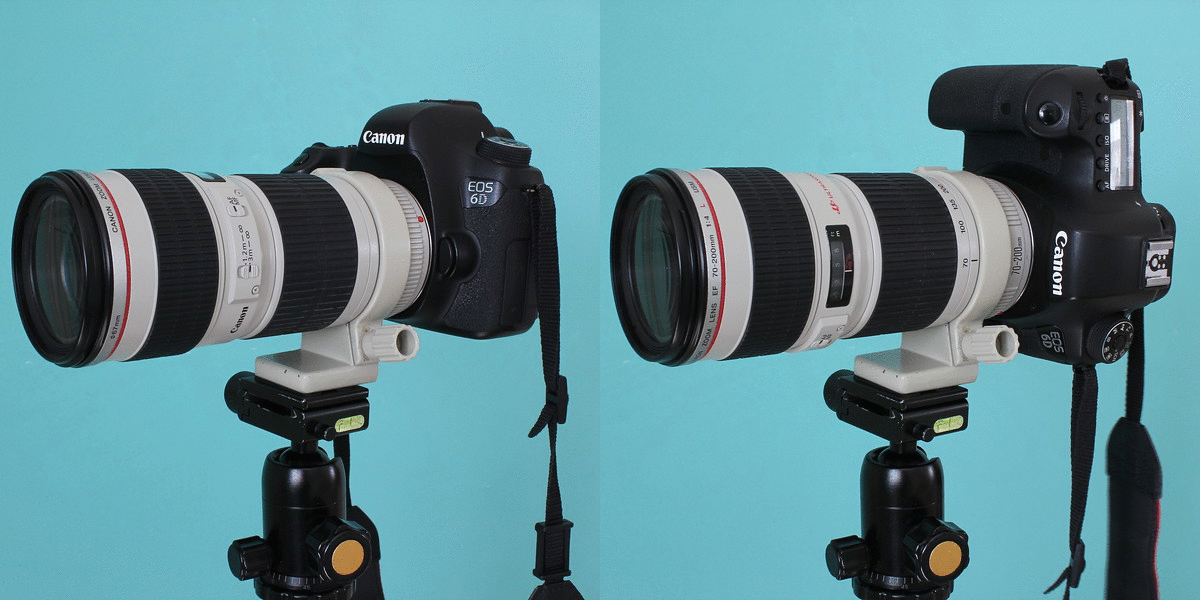
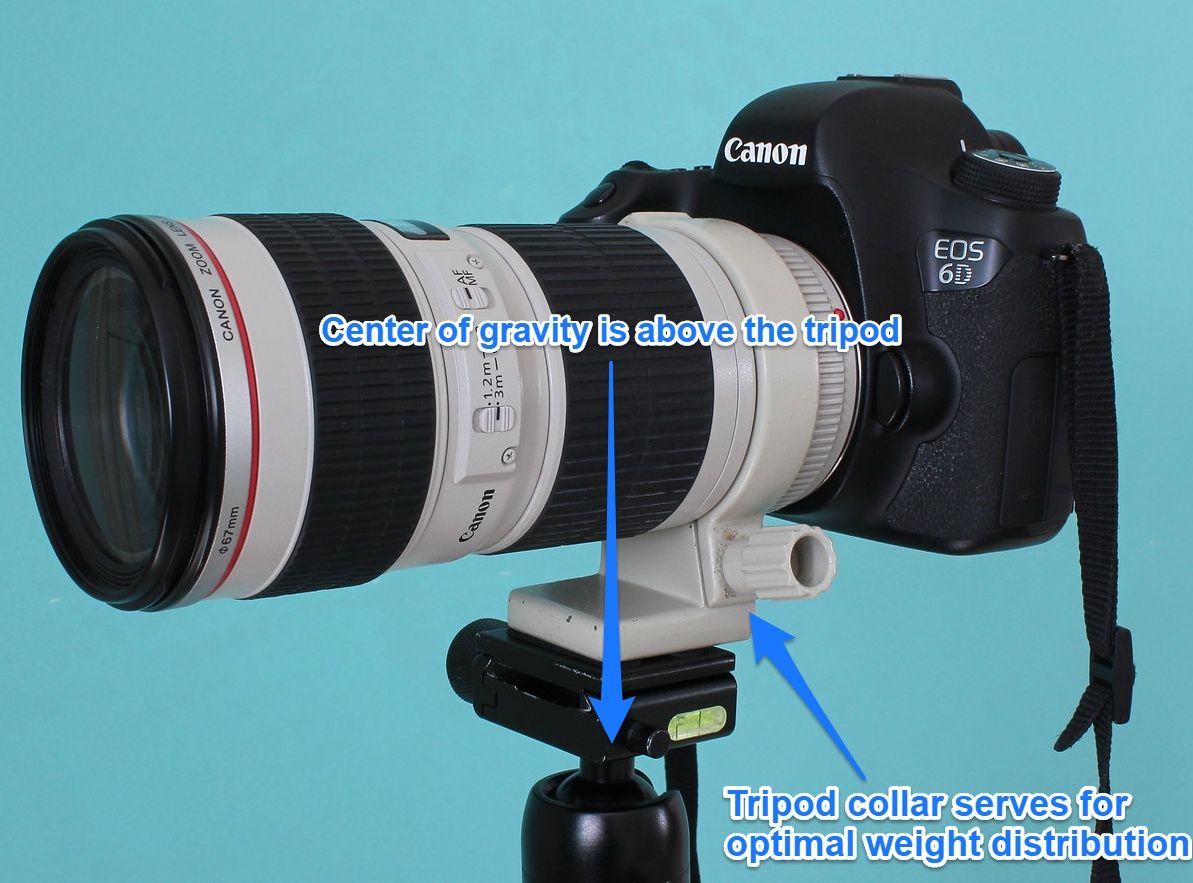
With bigger telephoto lenses manufacturers usually supply a so called tripod collar ring as well. This serves to optimize the weight distribution, and also to relieve stress on the body’s lens mount.
When shooting in landscape orientation it looks like this:
But what happens when you want to shoot in vertical (portrait) orientation?
Most people do this:
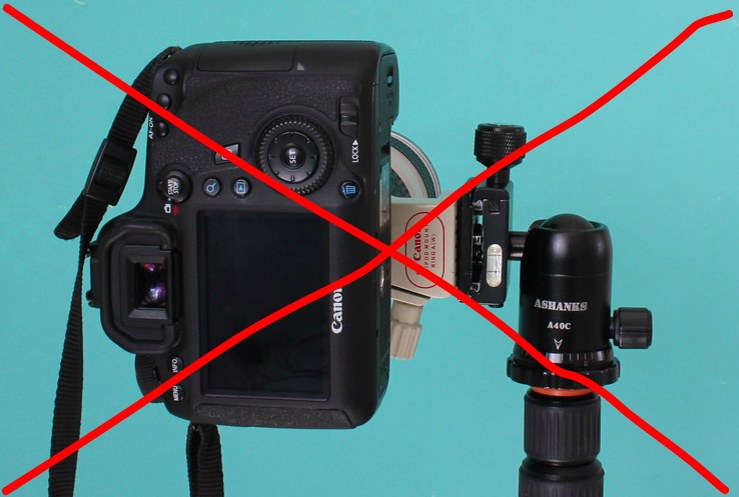
PLEASE NOOO!
The problem with this is that the center of gravity will fall next to the tripod: it’s going to lose a lot of stability, and it’ll be totally uncomfortable to compose this way.
So, the right way to do this…
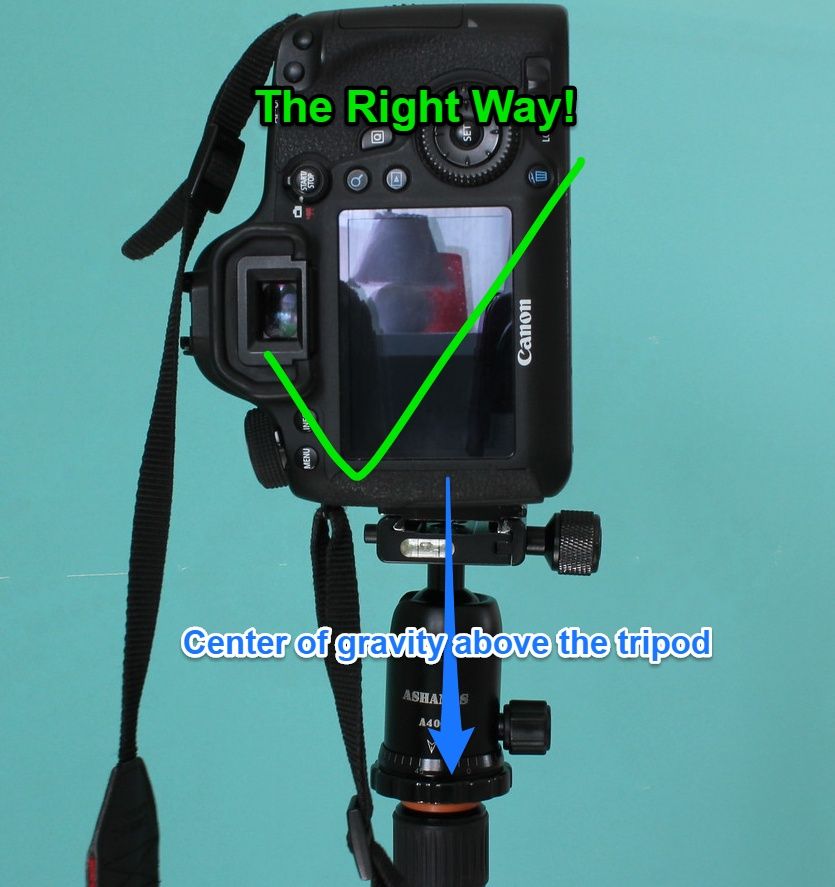
Is to loosen a bit on the collar, and rotate the lens in the collar!
Voilá!
Now it feels and looks so much better! The center of gravity is perfectly above the tripod.
Plus, as a bonus, leveling the camera is a lot easier too!
Continuing with another tripod trick….
4. Tripod trick when shooting from edges
I was shown this trick by a canadian landscape photographer, and I was immediately like “How on Earth have I not thought about this earlier?” Facepalm…
The picture below says it all:
You extend 2 legs, and leave the third folded. If required, you can even make that short leg stand at flat angle.
Advantages:
- you can go really close to edges
- you take up way less space (this matters at vantage points)
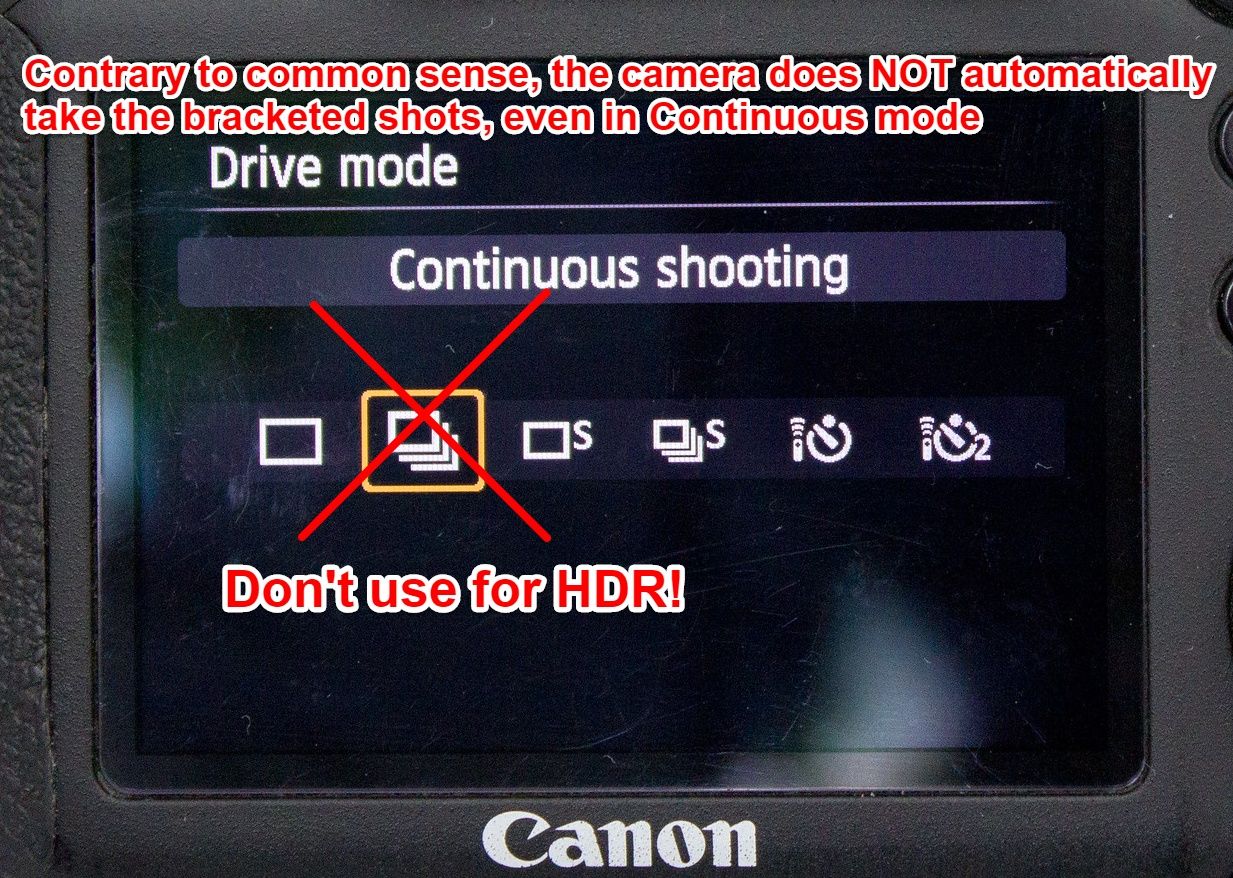
5. When bracketing, use the self-timer
(doesn’t apply to all camera)
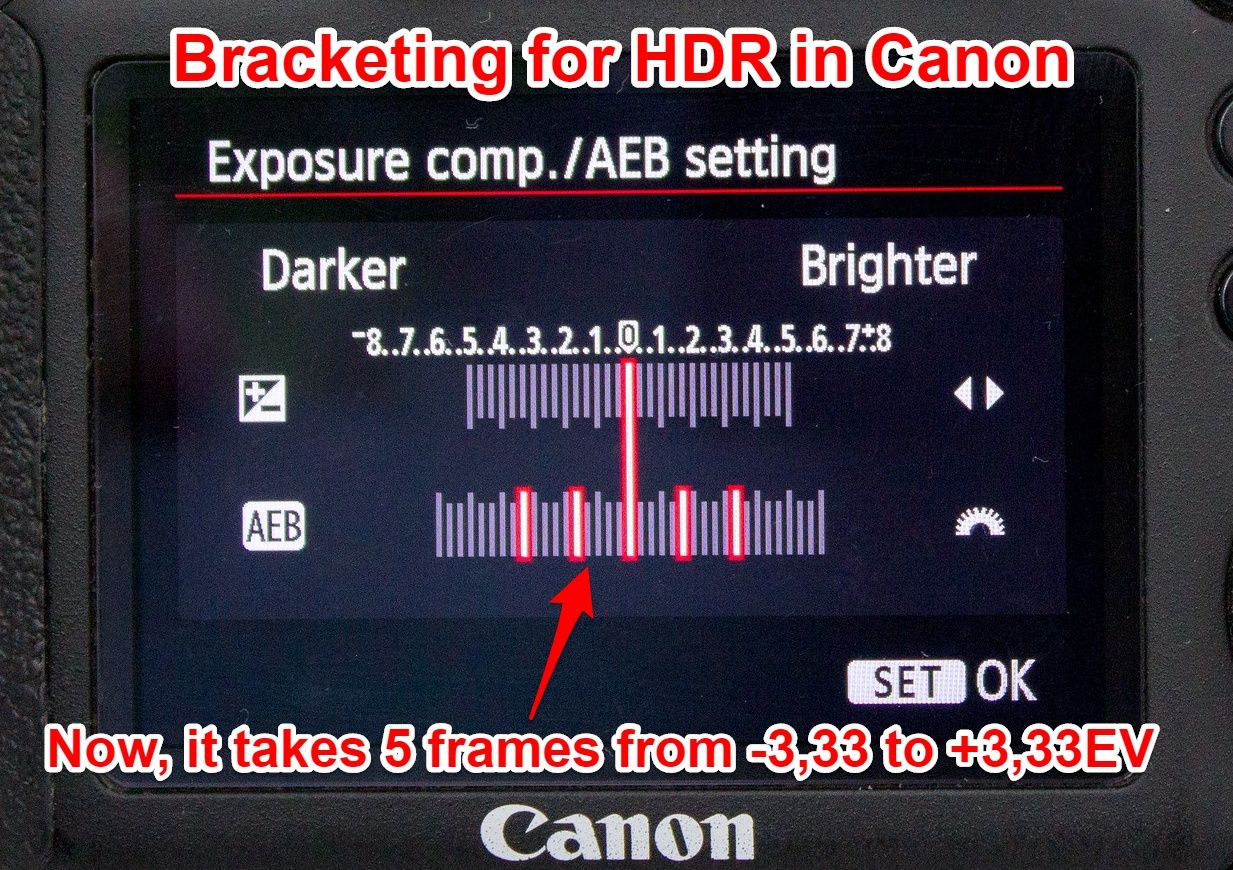
Whenever the scene has extreme differences in brightness, it’s better to use HDR technique, which requires bracketing. Meaning that the camera takes many shots with different exposure compensation to even further expand the dynamic range.
On Canon cameras you can configure the camera how many shots it should take: 3, 5 or 7.
The problem is, when you actually shoot the bracketing sequence, the camera doesn’t tell you when to stop, you have to count the number in your head.
I always hated this, because often I would lose track of how many shots were left.
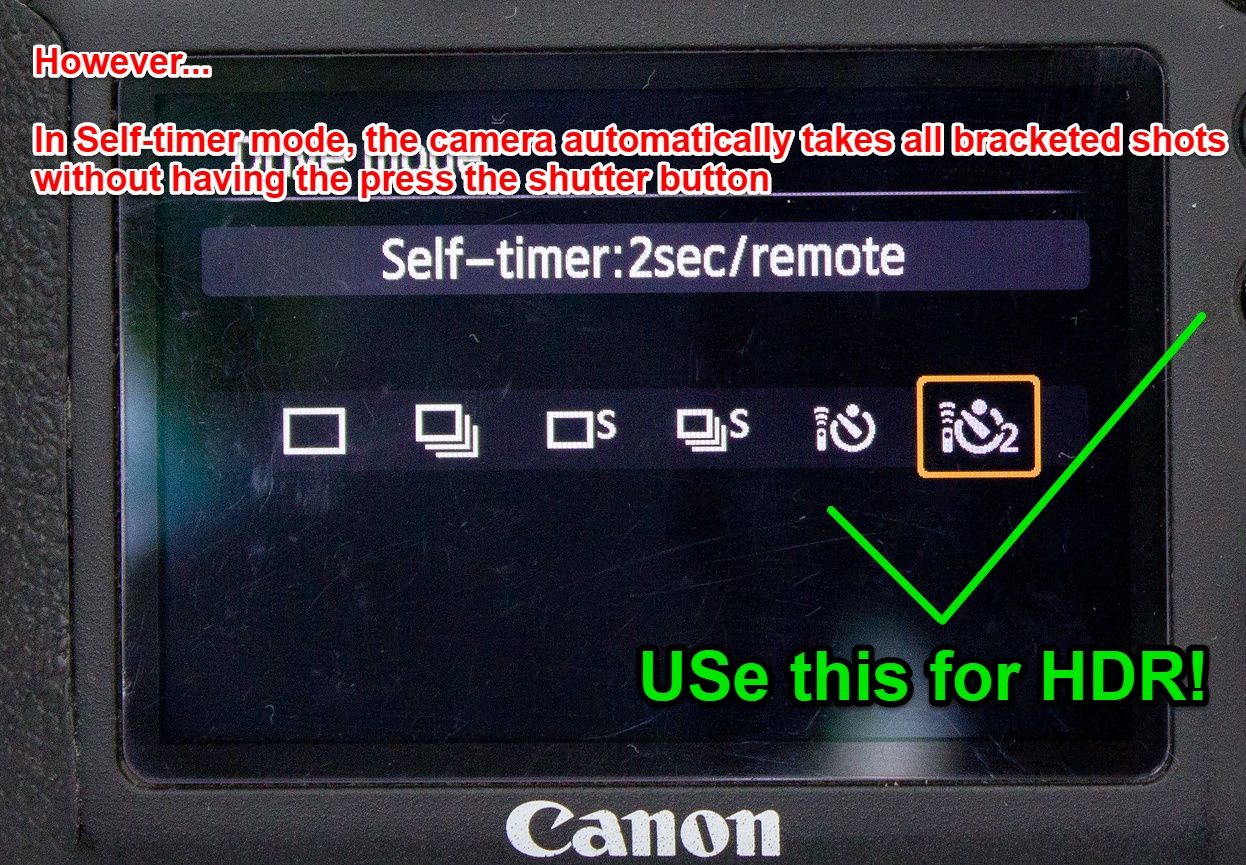
Until I found out, that if I set the drive mode to self-timer, the camera does the sequence automatically!
I just press the shutter button once, the camera waits 2 seconds, and then takes 3, 5 or 7 frames, with me having to touch anything. Awesome! 🙂
Onto now some sharpness tricks!
You can tell that I’m pretty obsessed with proper sharpness.
Why?
Because the composition, exposure can always be corrected to some extent, but sharpness can NEVER ever be corrected. It’s either sharp or not, and there’s nothing you can do after it was shot.
Use these tips, and you’ll be 100% sure on the spot if your pictures are sharp or not.
6. For maximal sharpness, manual focus in Live View mode
This is a must, especially for night photographers.
The phase detection AF system that’s in use when focusing through the viewfinder can often misfocus.
Especially in low light, or when using very wide aperture prime lenses.
And there’s nothing you can do to a misfocused picture… And when you take a portrait, and the eyes aren’t sharp, that ruins the whole shot!
You’ll often hear others telling you that “manual focus is the way to go”, but they often forget to add, that manual focusing is IMPOSSIBLE through the viewfinder, unless you have a special focusing screen.
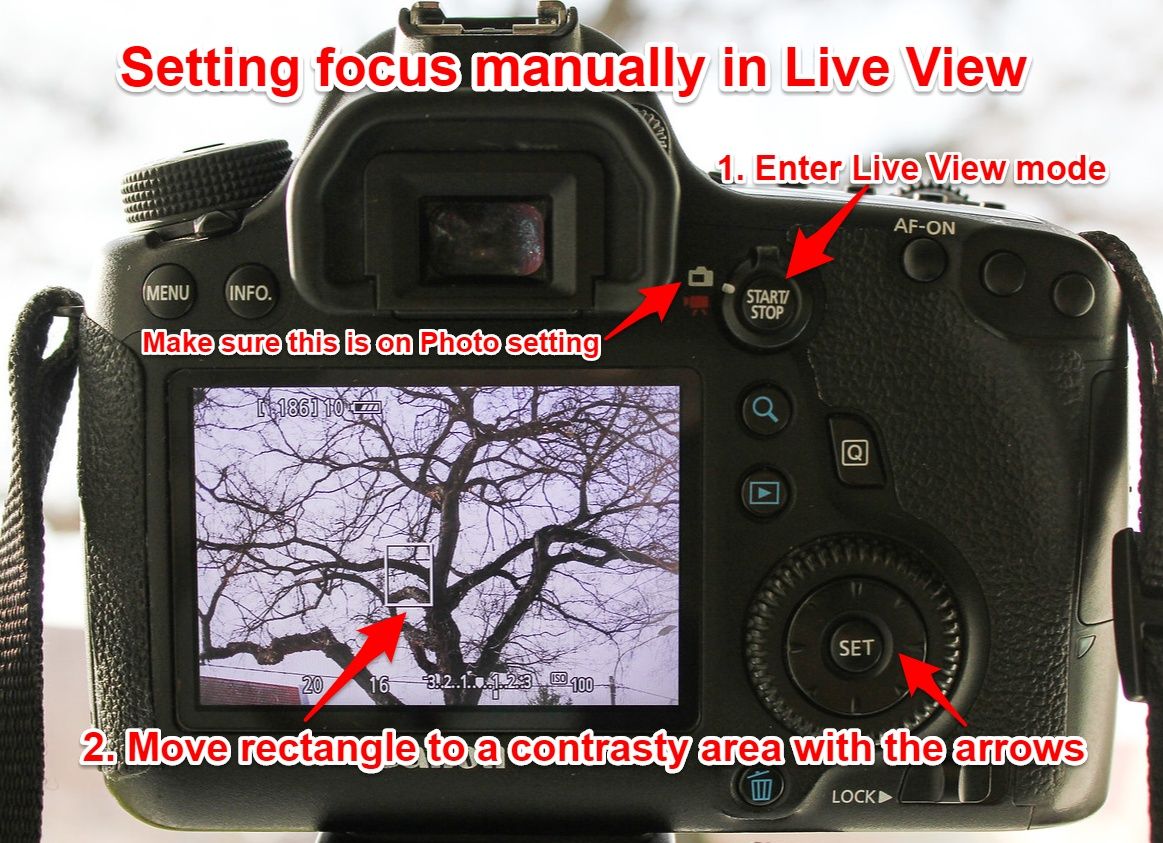
So when manually focusing, always do that through Live View and use these trick: you will be 100% sure if the sharpness is accurate.
1. Enter Live View mode
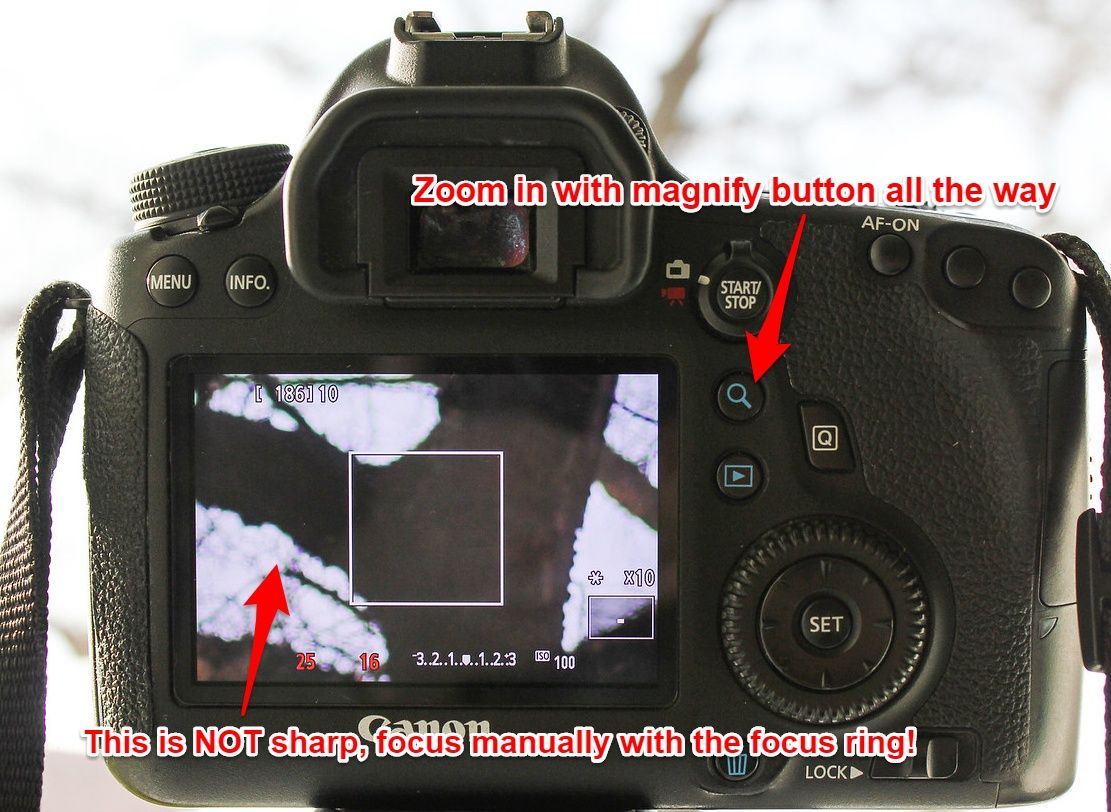
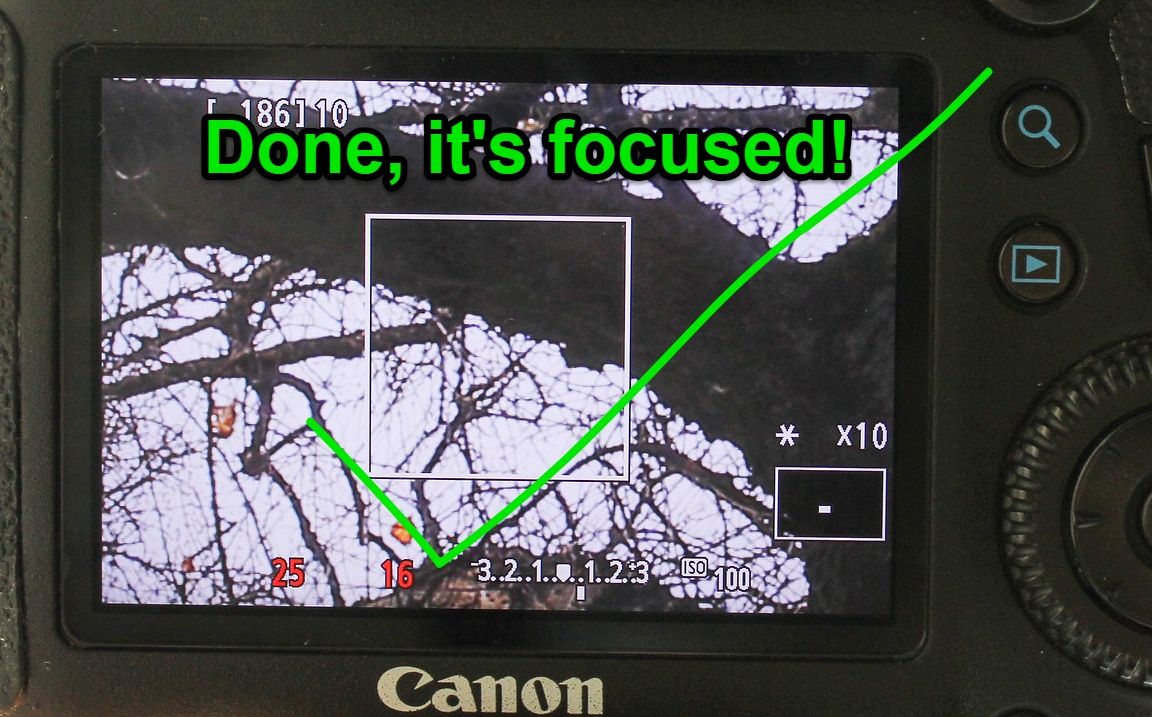
2. Magnify into the Live View mode
On most cameras, you can zoom into Live View mode. This is not zooming on the lens, but magnification into the Live View image.
The magnification is required to be able to tell the difference between out-of-focus and in-focus areas.
Pro tip for Canon users: if you’re using a fast prime lens, it may happen, that the magnified view is full with purple fringing. To reduce this, you can press the depth of flied preview button underneath the lens mount.
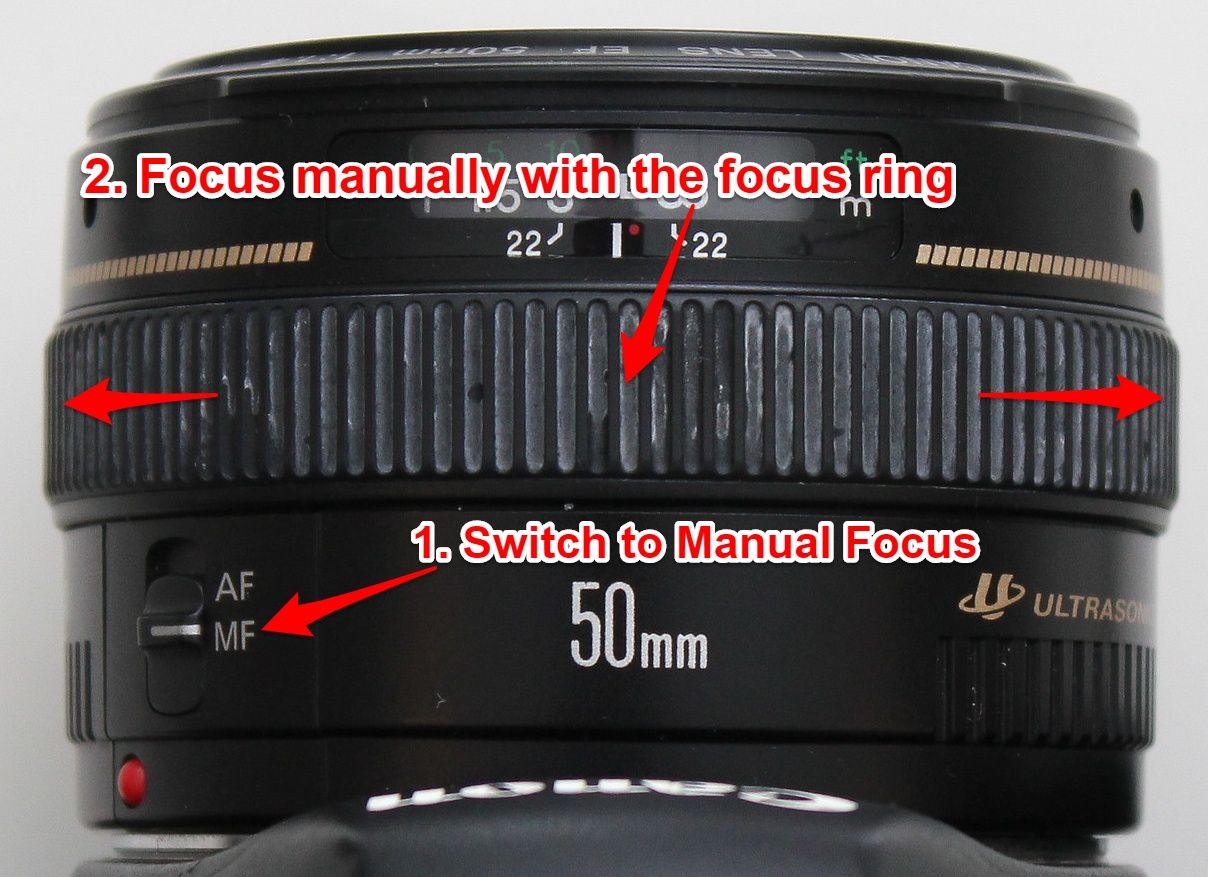
3. Set the lens to manual focus, and focus manually, until best sharpness
Very straightforward, but at night it can be challenging to see when it’s the sharpest.
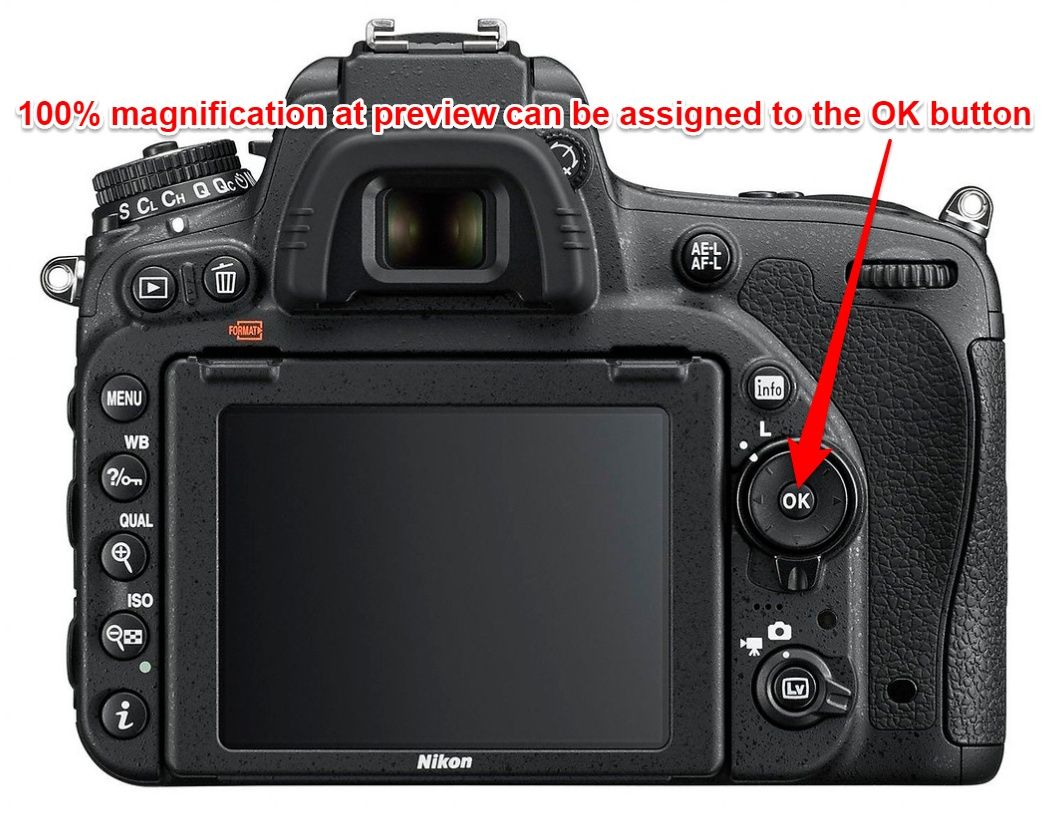
7. Configure magnify button to zoom in all the way immediately upon preview
After taking a shot, I always zoom in all the way into picture by pressing the magnification button.
I zoom to 100% magnification to really see all the details, and I can see if it’s sharp or not.
On most cameras, if you press the magnify button, it will just zoom in slightly, and you’ll have to rotate the dial or press the magnify button 5-10x more.
Who wants to do that? Not me, for sure! 🙂
Luckily, on most high end cameras, there’s a way to fix this.
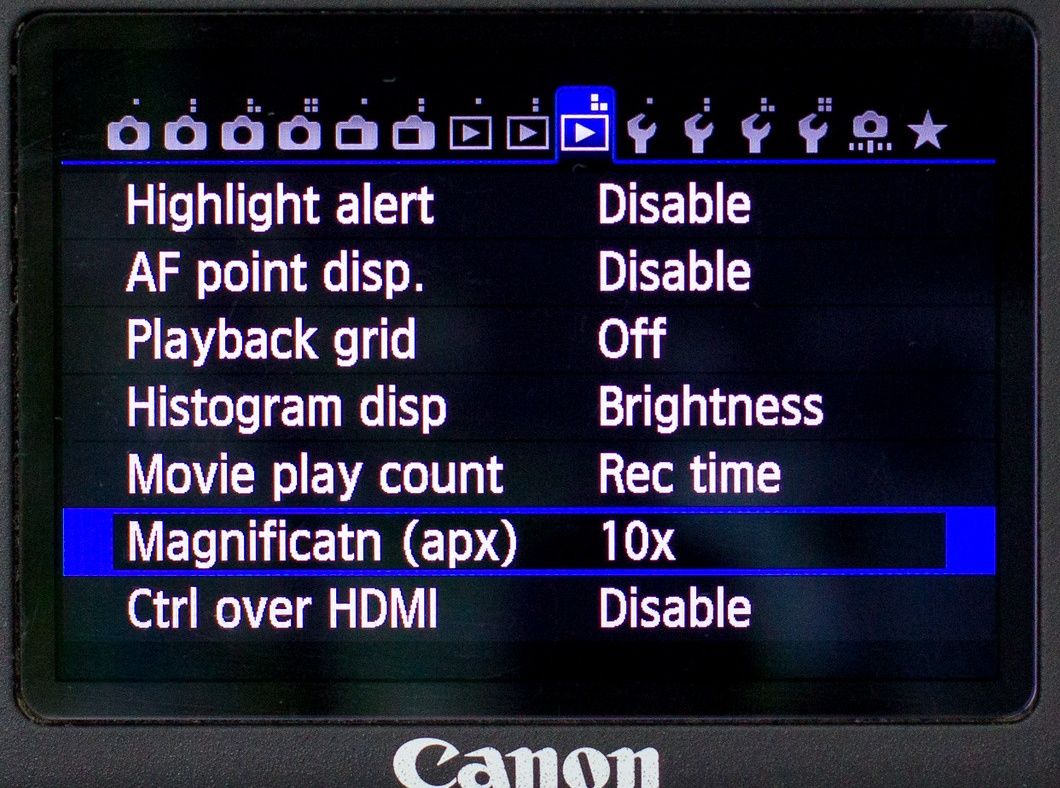
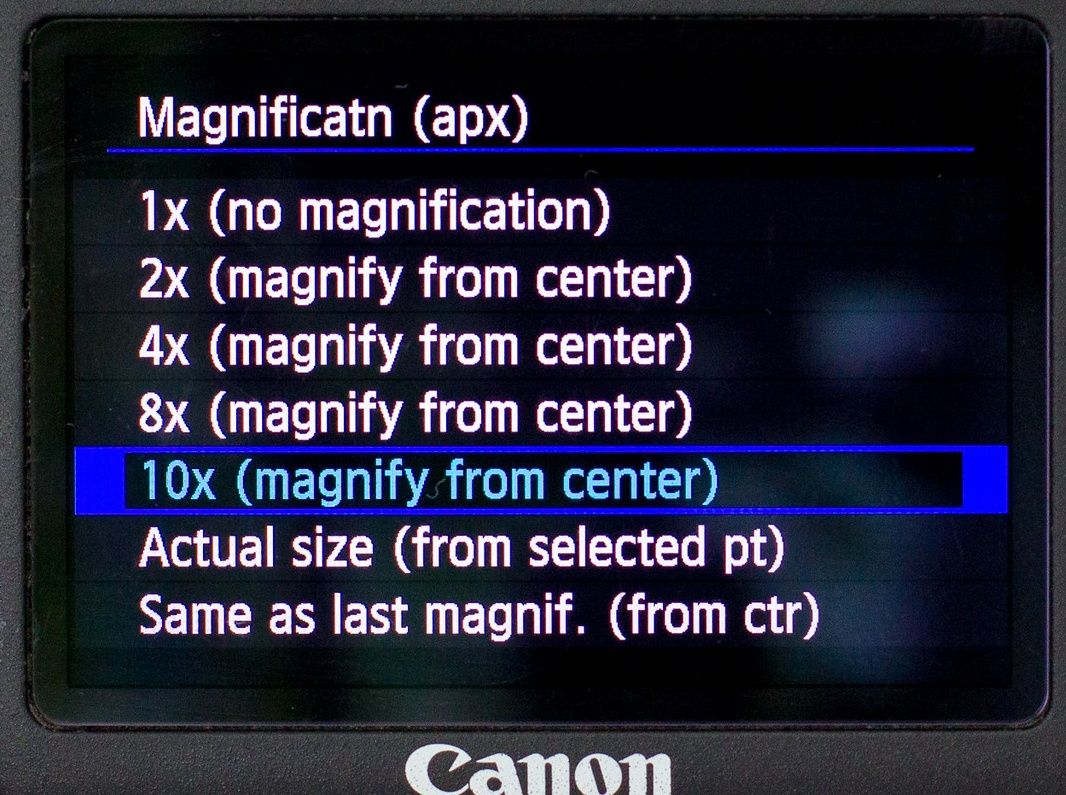
On Canons you can customize the what the magnify button does in preview mode:
On Nikons, it’s a bit different. You have to go Controls -> Multi selector center button -> Playback mode -> 1:1 (100%), as seen in the video above.
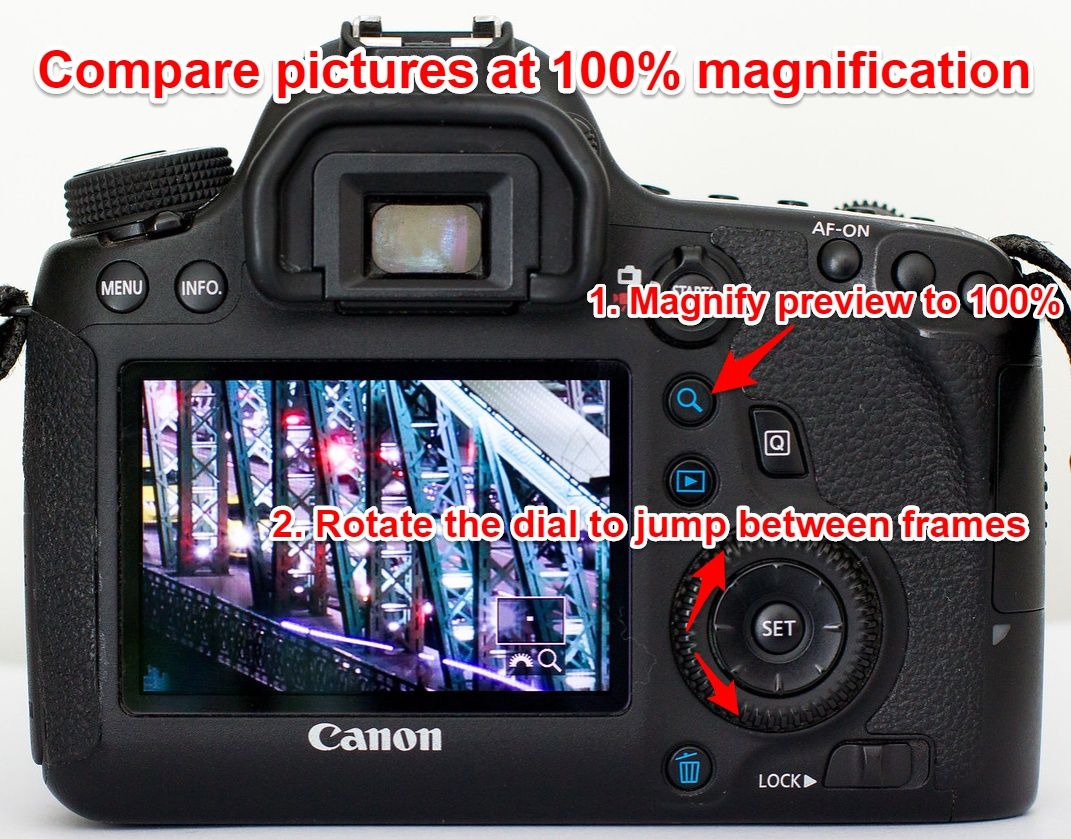
8. Compare the sharpness of multiple images upon preview
This is a very cool feature most people don’t know exists. And it exists on almost every camera model!
After taking a shot, I always zoom in all the way into picture by pressing the magnification button.
I zoom to 100% magnification to really see all the details.
Now comes the fun…
If I’d like to see the exact same part of the previous / next image, what do I do? Most people would zoom out, then go to the next picture, then zoom in again. But this process is a pain, and doesn’t allow direct comparison of the details.
So here’s what I do: when I’m zoomed in, I just rotate the dial, and it jumps to the previous / next photo on my card, while keeping the same magnification.
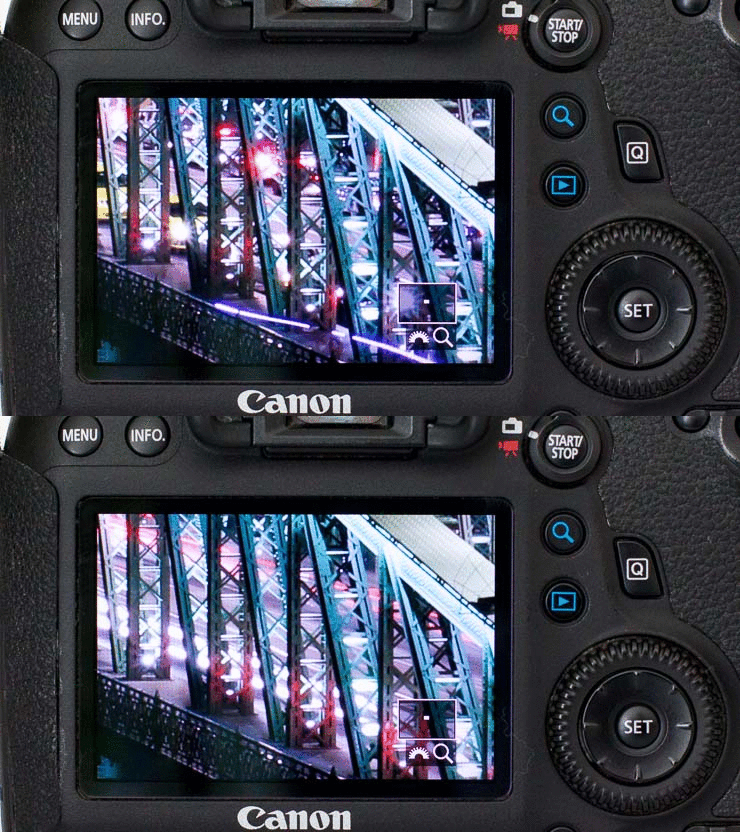
Here’s how it looks, when zoomed in the picture all the way:
Notice how it’s the exact same part of the previous picture, and how it helps to compare frames at pixel level.
Important: if you are using a lower end camera, that has only ONE dial, then you need to press the +/- button as well, and then rotate the dial. Just like you would change the exposure compensation.
8. Images look soft on the camera’s display? Here’s the solution for that
This is something that most people who shoot only RAW never realize. They just notice that the pictures on the display look soft, especially at 100% magnification.
The reason behind this is that even though when shooting in RAW file format, the camera still creates an embedded JPG file. And it’s this JPG file that shows up on the display.
Don’t believe me?
If I take a RAW file with my current camera, and put that card into a much older camera, the picture still shows up on the older camera’s screen. If the RAW format were displayed, the older camera would fail to show the picture.
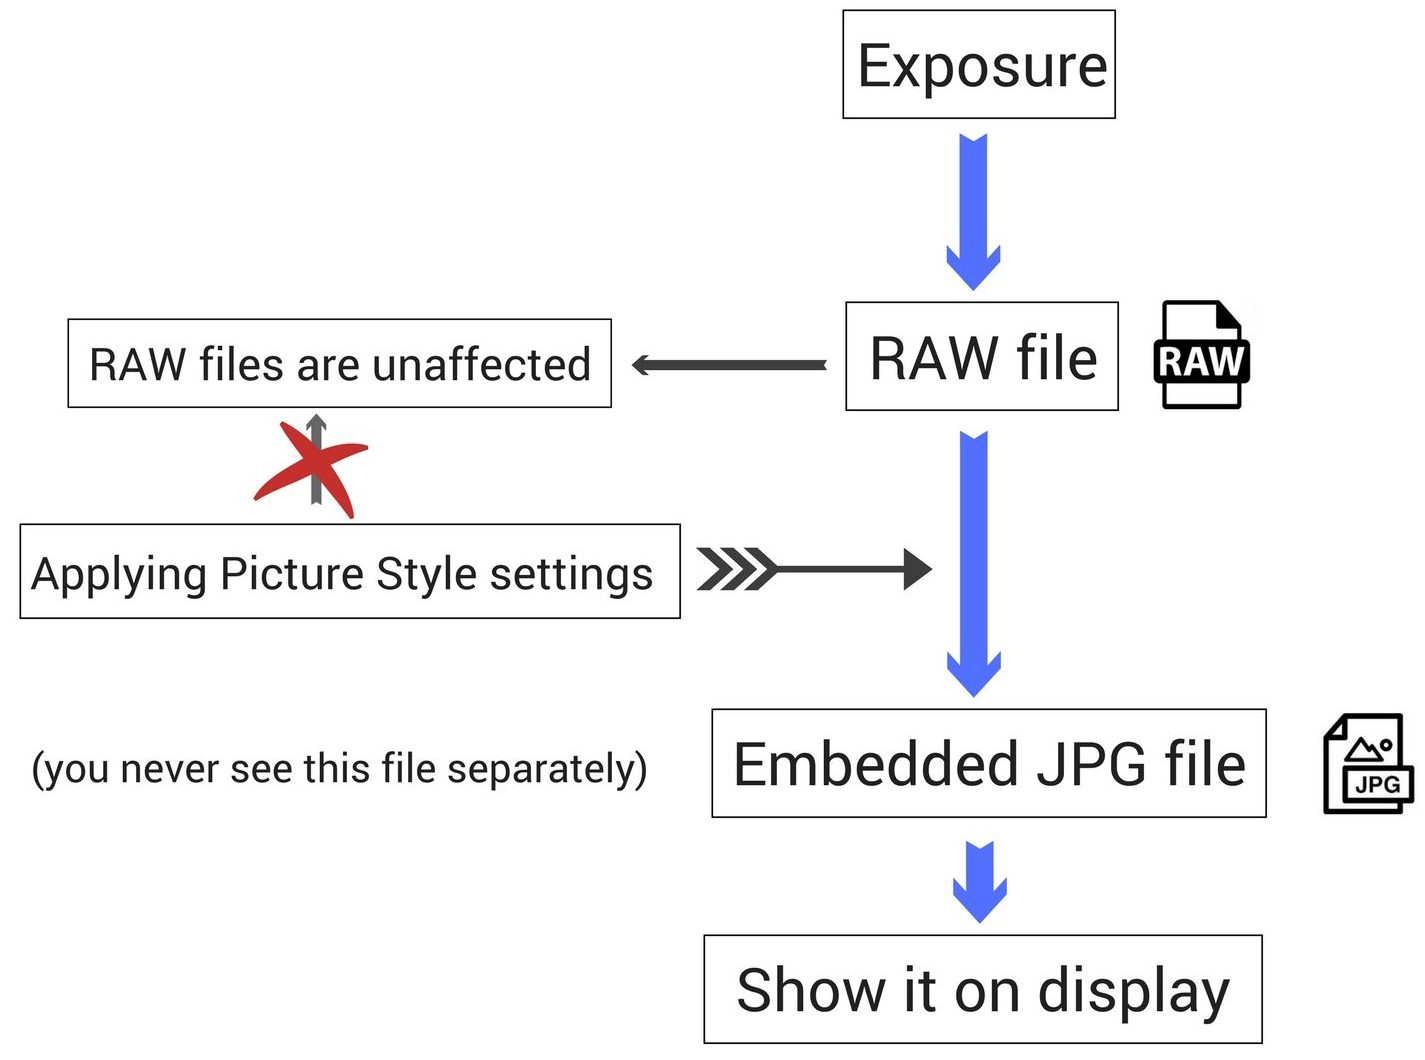
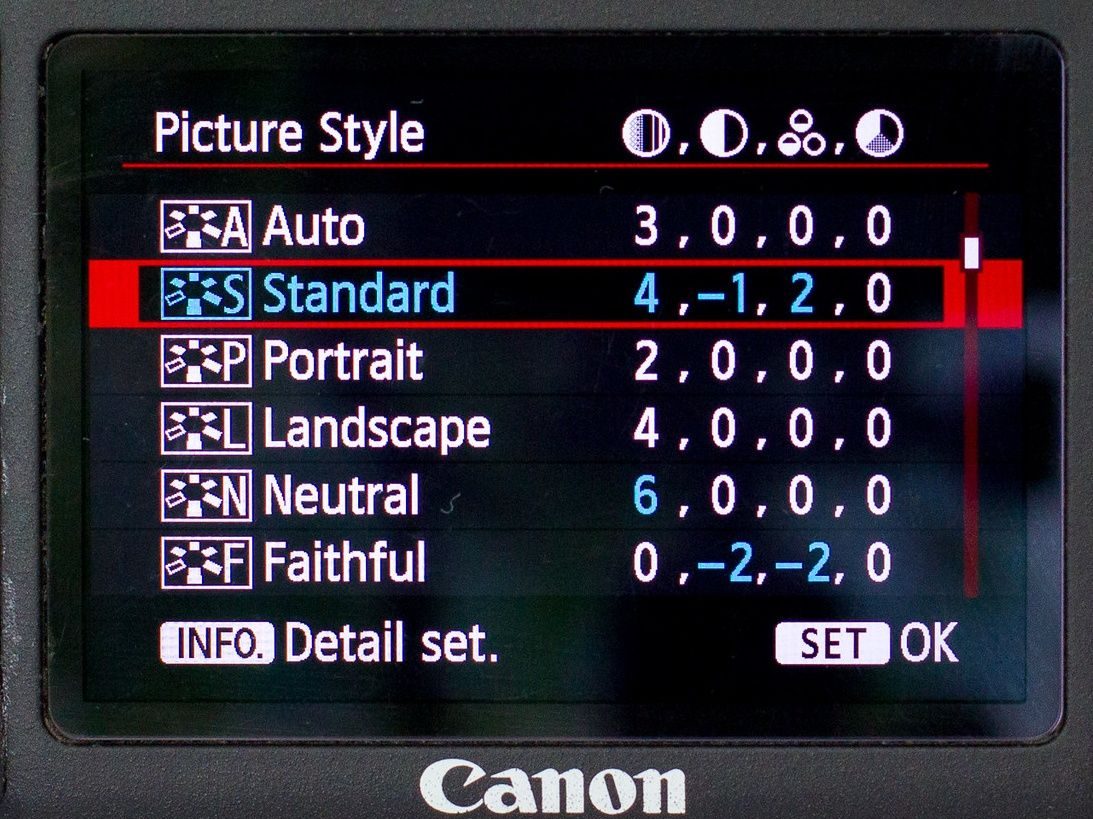
Back to where we were… This embedded JPG file is made in the camera at the time of the exposure. And it’s made accordingly to the Picture Style settings.
Most people think that the Picture Styles only matter when shooting in JPG, but that’s not all true.
It’s true that no matter the Picture Style setting, the RAW image on the computer will look the all the same.
But the Picture Style determines how it looks on the camera. And that’s a big thing: it really adds to the joy of shooting when you see on the spot that you have sharp images!
So I recommend you go into the Picture Style settings and select a picture style, where the sharpness is set to the middle. Or you can edit any of the styles, or create a new one.
Useful links about setting about different camera brands
Steve Perry’s back button focus video
Steve Perry’s Nikon DSLR small tricks video (if you’re a Nikon user, you HAVE to watch this)
Brian Smith on setting up back button AF on Sony A7 series
